Veeam Application Backup Repository (ABR) in v13.1 for network devices

Introduction

The release of Veeam Backup & Replication v13.1 introduces a significant new capability: the Application Backup Repository (ABR). Positioned as a secure landing zone for application‑generated backups, ABR brings hardened storage, snapshot lifecycle management, and immutability to workloads that generate backups of data or configurations to an NFS share. Databases and network devices come to mind and are mentioned in the documentation here: Application Backup Repositories – Veeam Backup & Replication User Guide.

“Configuration data of network devices: firewall or switch configurations.”

These “backups” or exports traditionally operate outside Veeam’s agent‑based or hypervisor‑based protection models. But while ABR is a powerful addition, it’s important to understand where it truly fits and where it doesn’t. When I first read the blog posts from Michael Cade and Anthony Spiteri, my first use case were network and IoT devices as they both mention it.
In particular, the idea that “network devices and IoT systems” can directly use ABR is more theoretical than realistic for most devices. The majority of those devices do not have an NFS client to write to an NFS share directly. That said, we can leverage the Application Backup Repository to improve backup and recovery services to our (internal) customers.

This post gives you a clear, realistic overview.

What ABR Actually Is

ABR is a feature of the Veeam Hardened Repository appliance. It exposes managed NFS volumes that applications can write their own backup files to. Each application receives its own isolated NFS export, and Veeam handles:

  • Snapshot creation and retention
  • Immutability enforcement
  • Instant rollback to any snapshot
  • Backup copy to secondary storage
  • Secure access control (Kerberos optional)

This allows application teams to continue using their native backup tools, such as RMAN, Backint, pg_dump, MongoDB dump, MySQL dump, custom scripts, while gaining Veeam’s hardened storage and recovery workflows.

Where ABR Shines

ABR is ideal for workloads that already support writing backup files to NFS:

  • Oracle RMAN Incremental Merge
  • SAP HANA Backint or file-based backups
  • PostgreSQL (pg_dump, WAL archiving)
  • MongoDB / MySQL / MariaDB dumps
  • Linux-based application exports
  • DevOps pipelines writing artifacts to NFS

These workloads benefit from ABR’s snapshot rollback, immutability, and backup copy integration without changing their native backup processes.

Network appliances and IoT device limitation

When it comes to most network appliances and IoT devices we are confronted with the limitation that they cannot write to NFS as they lack:

  • an NFS client
  • POSIX-compliant file handling
  • kernel-level NFS support
  • secure session handling (Kerberos, AUTH_SYS)

Typical network gear supports:

  • TFTP
  • FTP / FTPS
  • SFTP / SCP
  • HTTPS API upload
  • Proprietary backup formats

Typical IoT devices support:

  • local flash storage
  • MQTT / HTTP upload
  • cloud sync
  • proprietary export formats

NFS is almost never supported. So while ABR can technically accept NFS writes from any capable device, the practical reality is that network and IoT devices will not use ABR directly. This is something to keep in mind.

A Practical Workaround: How to Still Protect Network & IoT Backups with ABR

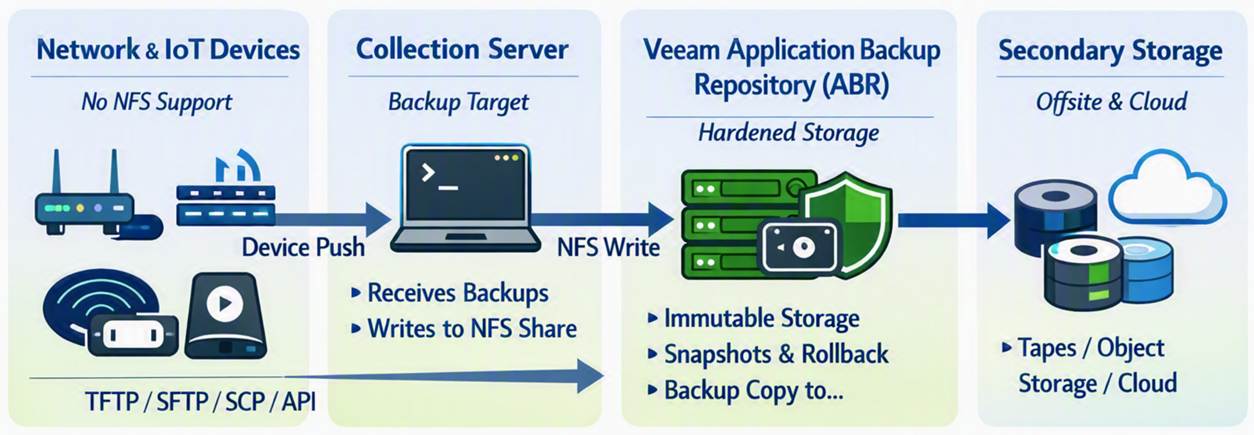
Even though network/IoT devices cannot write directly to NFS, you can still protect their backups using ABR by introducing a simple intermediary.

Workflow

  • Network/IoT device exports its backup (TFTP, SFTP, SCP, API, etc.)
  • A Linux server or automation node collects these backups
  • That server or servers write(s) the collected files into the ABR NFS share
  • Veeam handles snapshots, immutability, and backup copy from ABR
Benefits

  • Hardened storage for device backups
  • Snapshot rollback
  • Immutability
  • Backup copy to secondary storage
  • No unprotected local storage
  • This is the realistic way to use ABR for network gear and IoT systems.

Pricing

Well, it could work out to be cheaper than a NAS license for Veeam, but maybe not if you only store config file backups on there. I mean 1TB goes a long way for config backups only.

That said, in both cases you pay some money to have additional Veeam capabilities and immutability with granular and backup admin-managed recovery options. That might be the reason you want it over just backing up one or more virtual machines with the network appliance and IoT device backups on it. Think about it, a backup admin can provide a network engineer with a secured download of an encrypted zip at zero-dark-thirty in the morning without needing to restore files from a virtual machine, which might require a recovery key etc. Does that fit your security rules? Maybe, maybe not. But that is up to management to decide when they are down an extra 6 hours waiting for the file(s) from inside the Virtual Machine to be restored.

Conclusion

The Application Backup Repository is one of the most interestingl additions to Veeam v13.1, especially for enterprise databases and Linux-based applications that already support NFS. It brings hardened storage, immutability, and snapshot-driven recovery to workloads that previously lived outside Veeam’s ecosystem.

However, ABR is not a direct backup target for most network devices or IoT as far as I can see. These devices simply do not support NFS. The good news: with a lightweight collection server acting as an intermediary, you can still bring their backups into ABR and benefit from its security and lifecycle management.

ABR is powerful — but only when used where it actually fits. All this is lab and theory, it is early days yet and I am sharing my thinking process out loud with you. Nothing more, nothing less.
How to open a root shell on the Veeam Software or Infrastructure Appliance

Introduction

Veeam’s Software Appliance (VSA) and Infrastructure Appliance are hardened by design out of the box. They’re secured, protected, consistent, and predictable, but they’re also unapologetically locked down. There is no SSH, no shell, no root, no sudo. Everything is protected via requests and explicit approvals.

That’s good for security. But it also means you need to understand the actual workflow for getting shell access, especially root access, when you might need it.

This post walks through the real‑world process, the UI flow, the approval logic, and the operational pitfalls. We’ll even cover the “I disabled the web console and need to fix that” scenario.

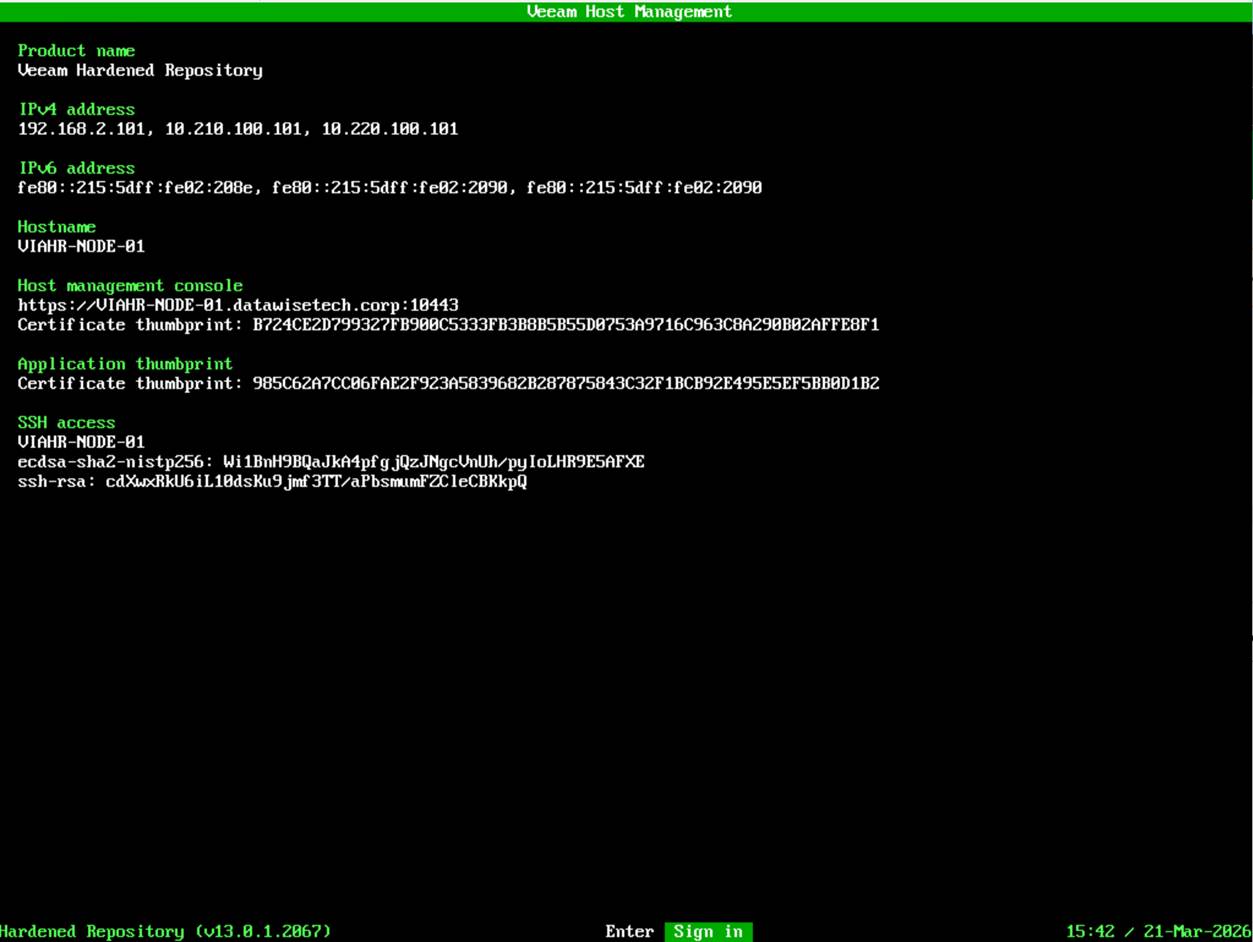
There are two ways to get SSH access. First, there is the Veeam Host Management console locally on the machine, the one that is available at first boot. After configuration, you will also have access via the web host management console over port 10443.

How to get root access?

Root access can be obtained through 3 pathways that are essentially the same. The first two are again the Veeam Host Management console, locally on the machine, and the web host management console on port 10443. Once you have SSH access, you can request root access via the Veeam Host management console over SSH as well. You can also restrict access via these interfaces.

Note

I also enable the security officer option in the lab. That can indeed be annoying during testing, but I like to train with the tools I will use when it’s for real. You learn and operate under the same restrictions as in production and, yes, suffer the same frustrations at times. That is the price of security.

The local Veeam Host Management console

At your appliance console, select Sign In.

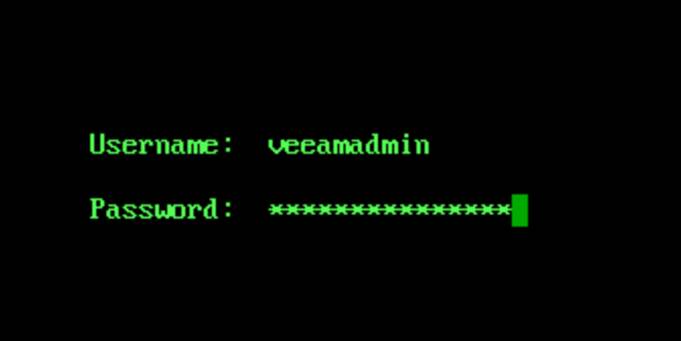
Enter your username and password and hit ENTER.

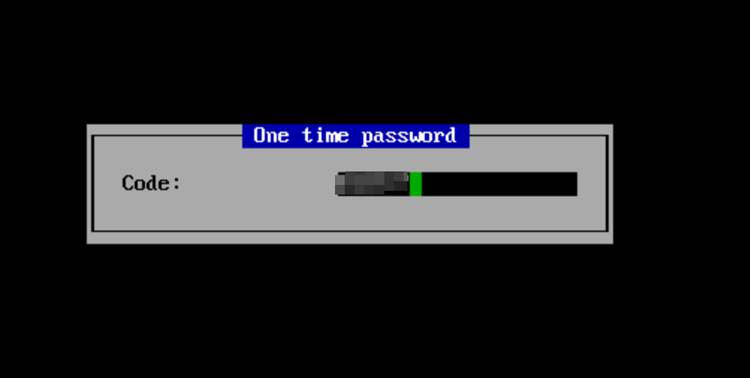
When prompted, enter your OTP to login.

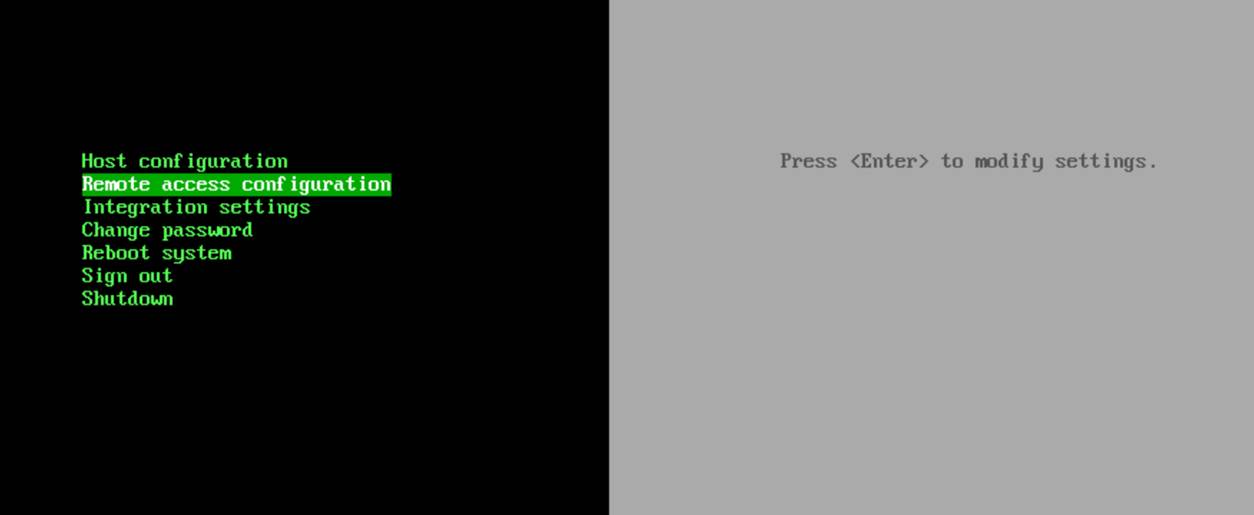
From that point on, everything you need lives under the Remote Access configuration.

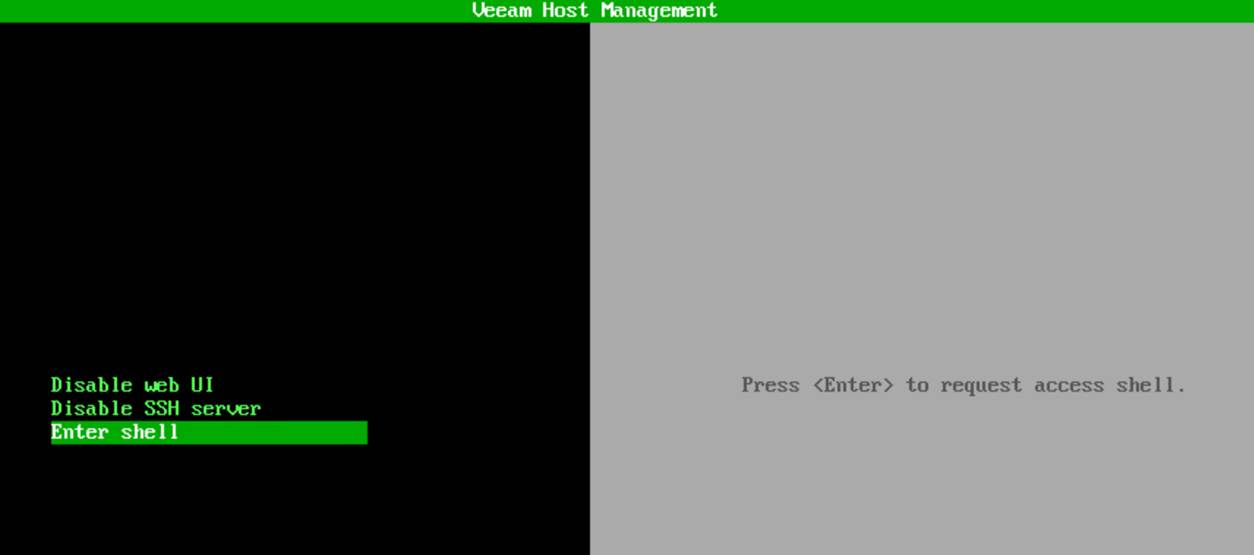
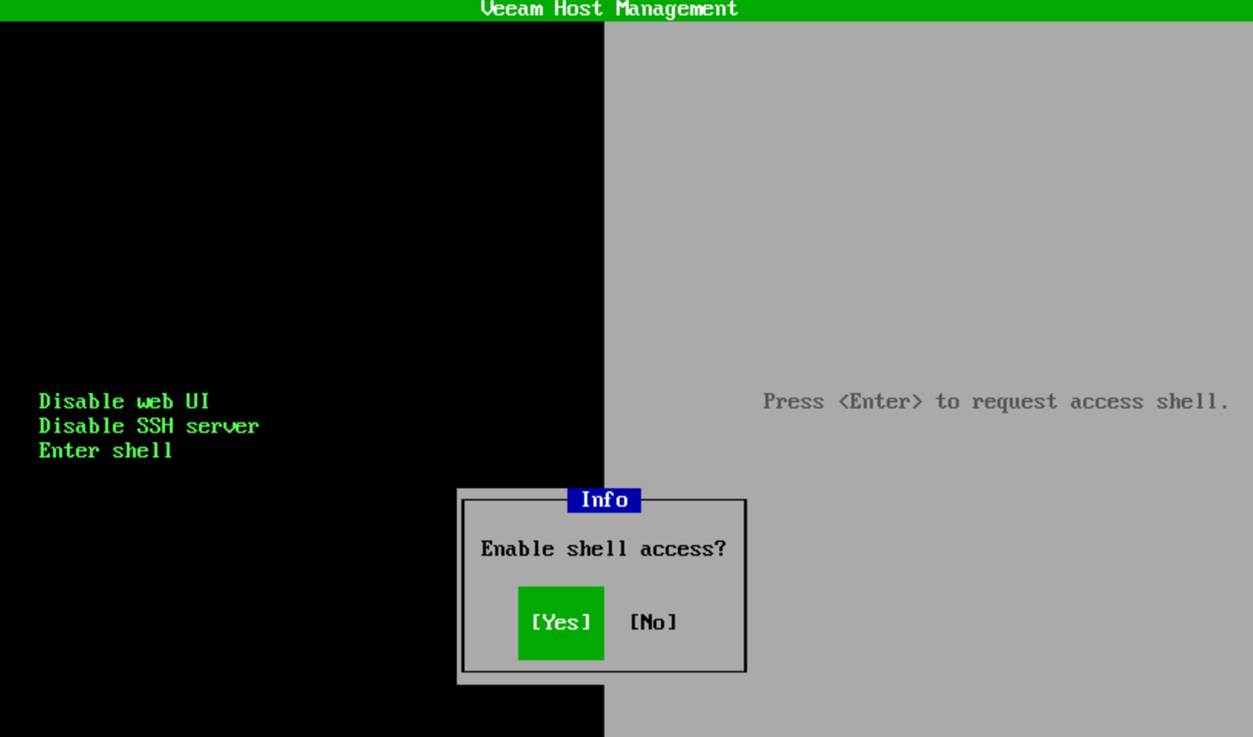
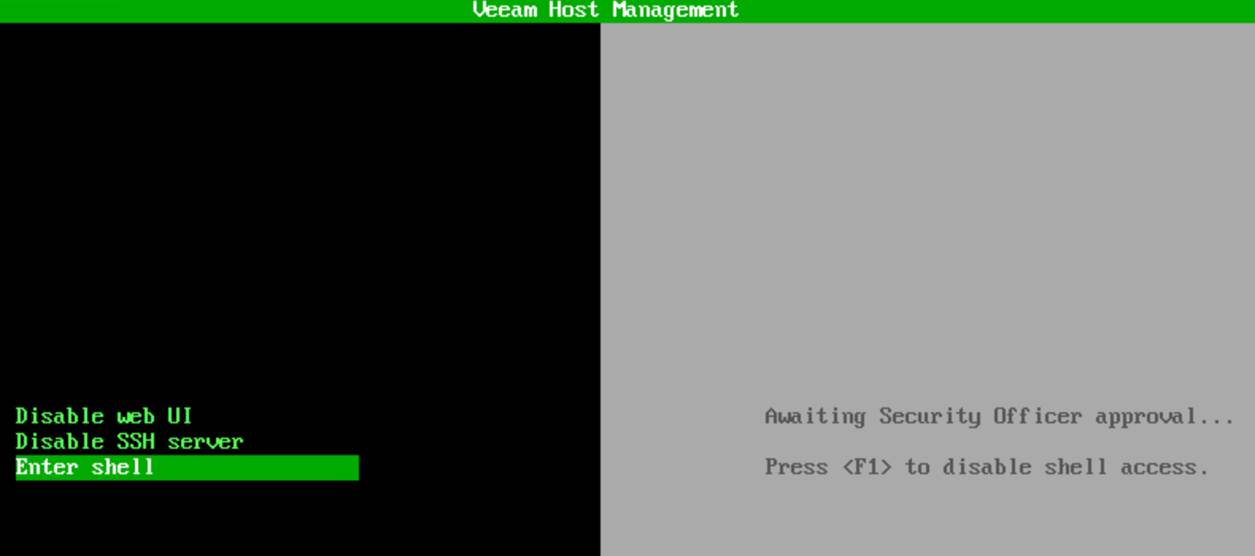
To request shell access, you choose Enter shell.

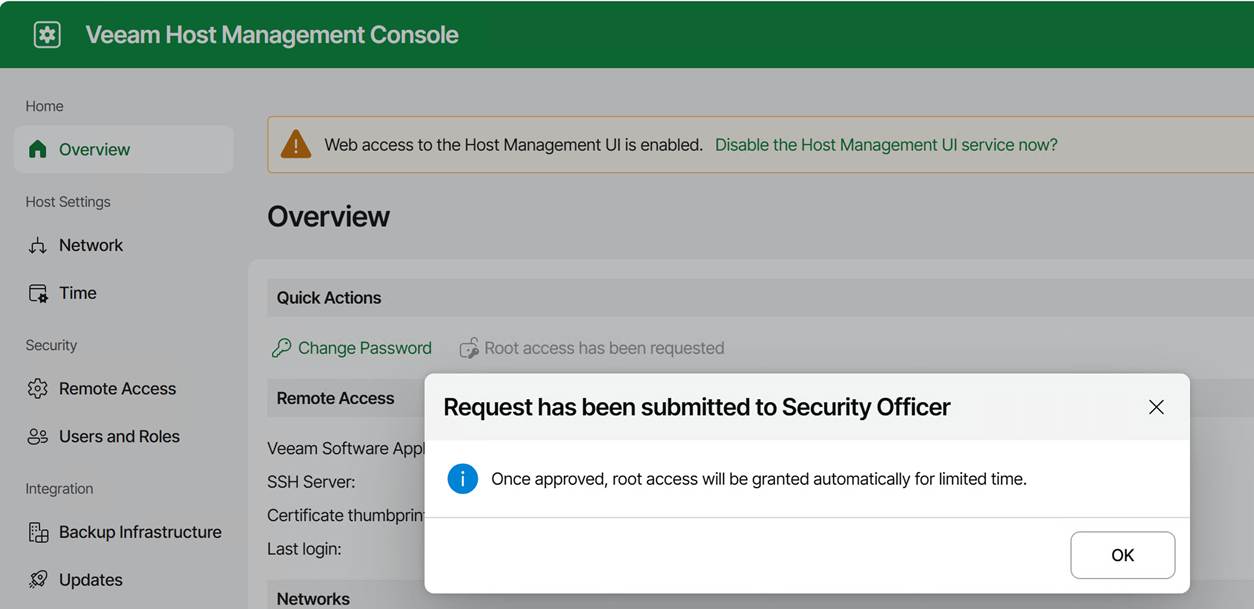
As mentioned, we have a security officer, so approval must be granted by that person.

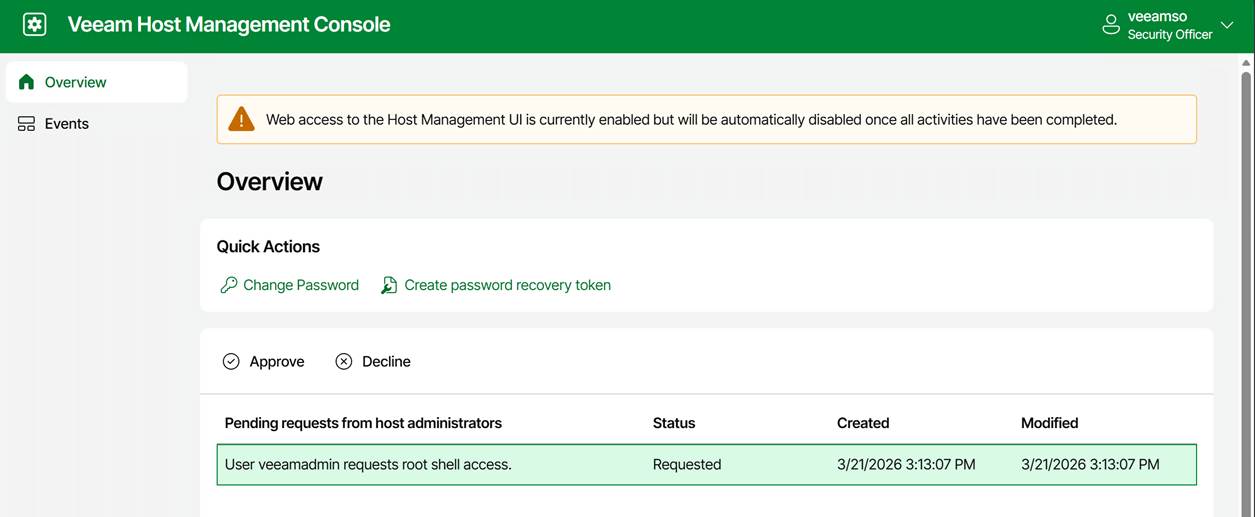
The security officer can now approve or decline your request.

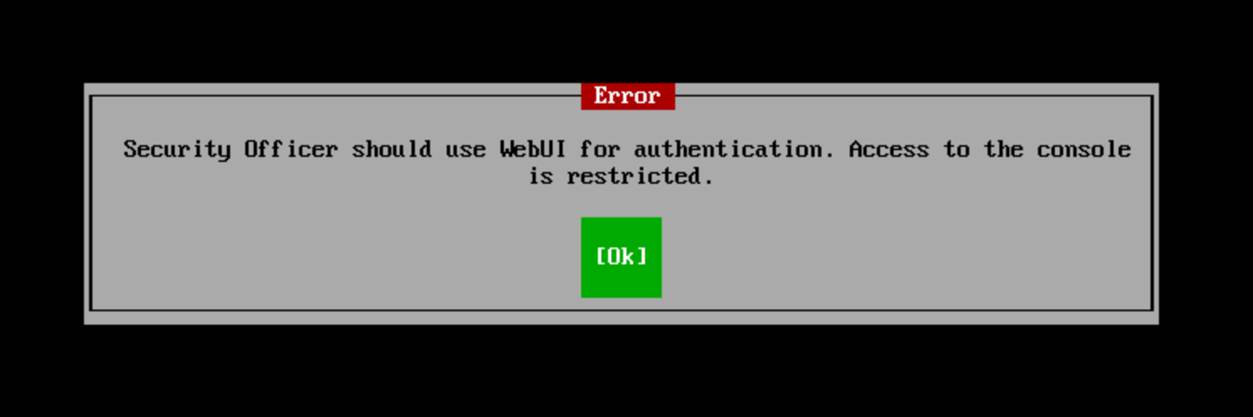
FYI: the security officer sign-in is only available via the web console!

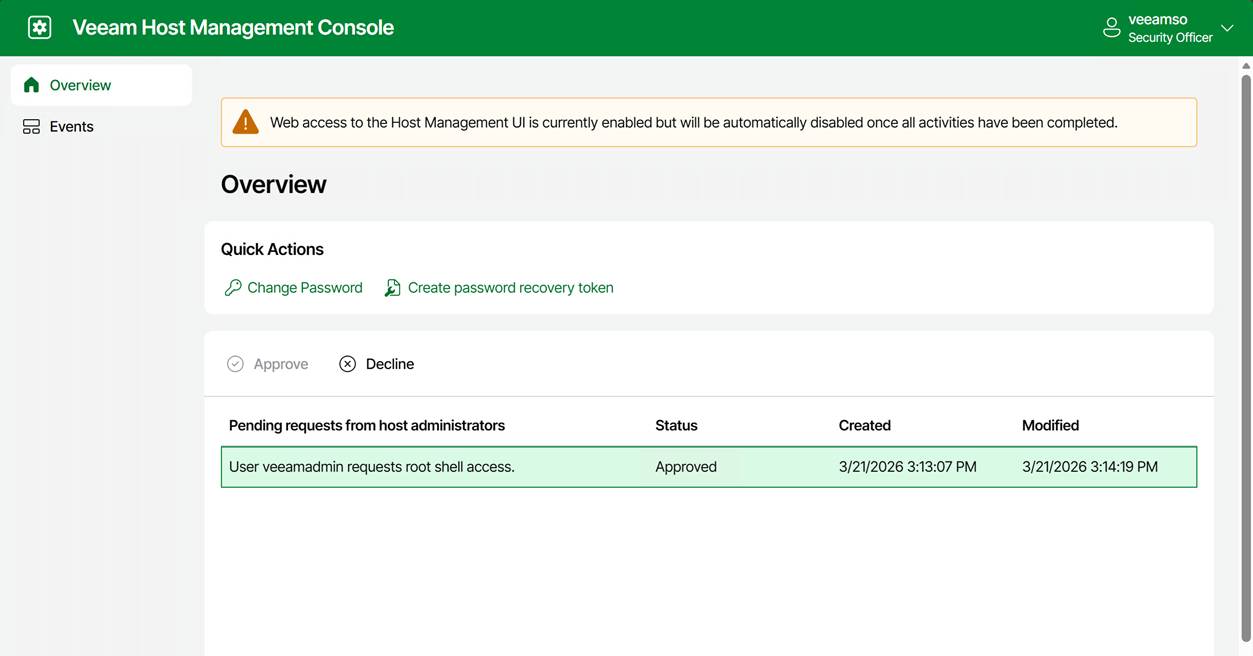
Note that the entry for the approved request does not disappear. The security officer can decline it at any moment. For example, when you notify the security officer that you have completed your work. If not, it will expire after 8 hours.

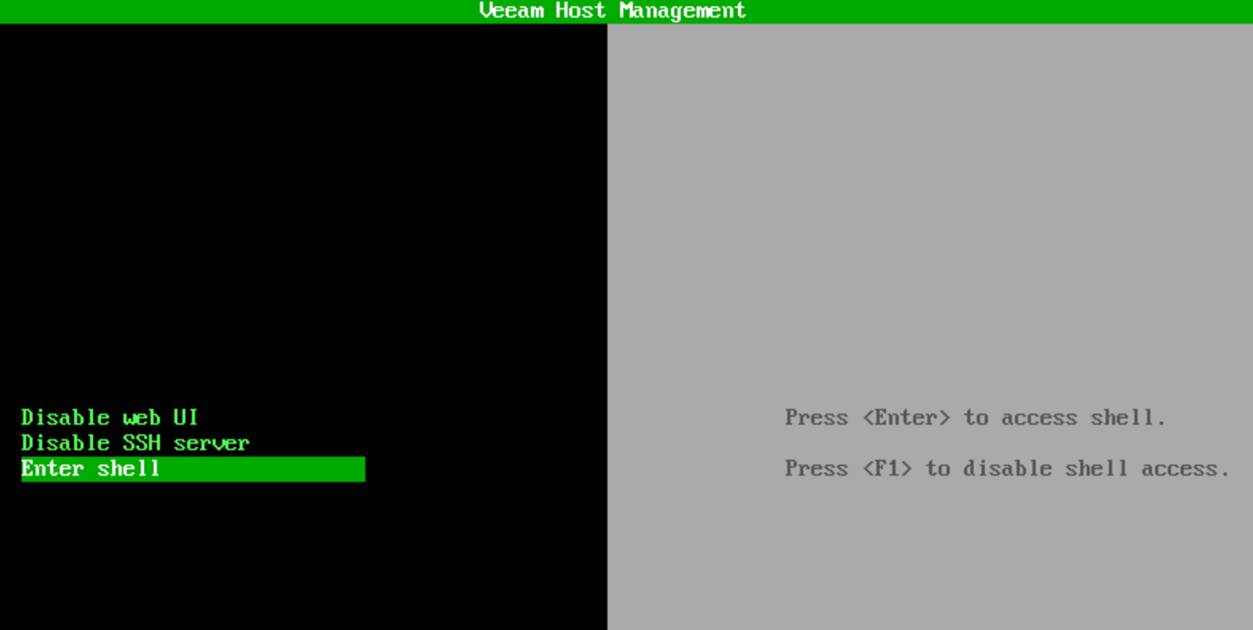
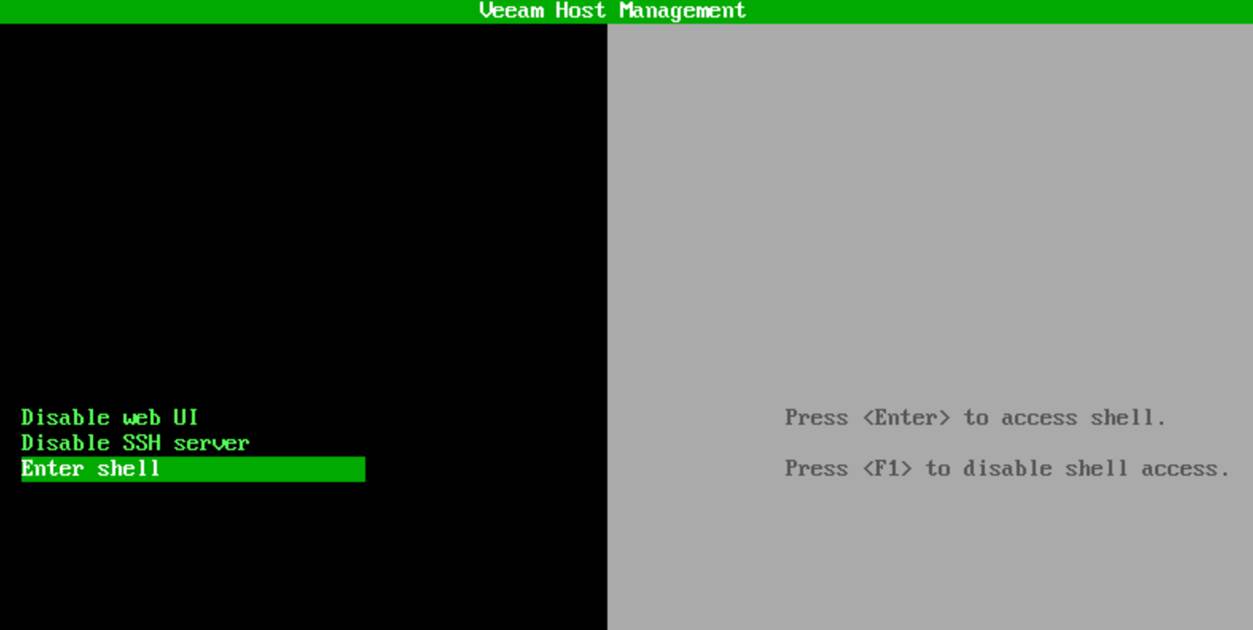
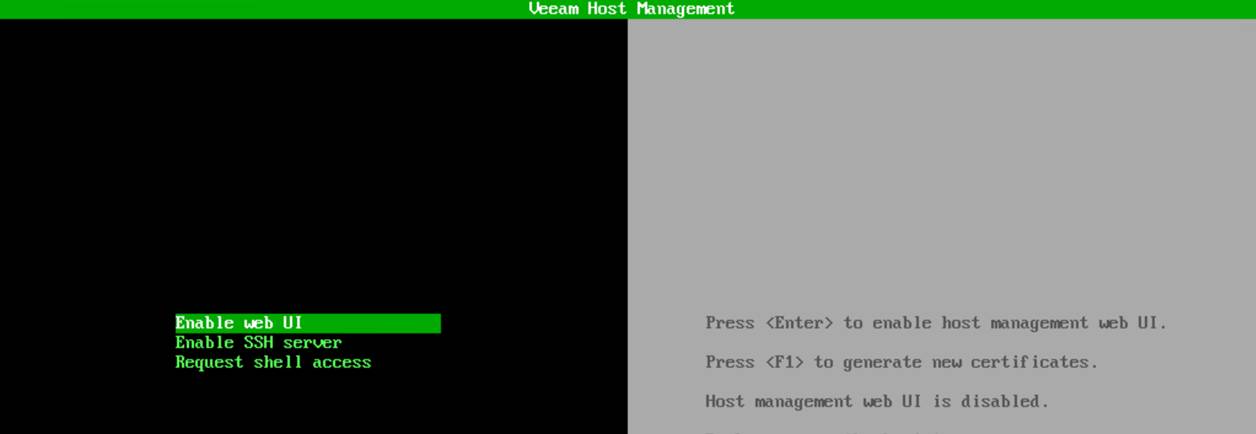
Anyway, the console message changed to “Press <Enter> to access shell” and “Press <F1> to disable shell access.”

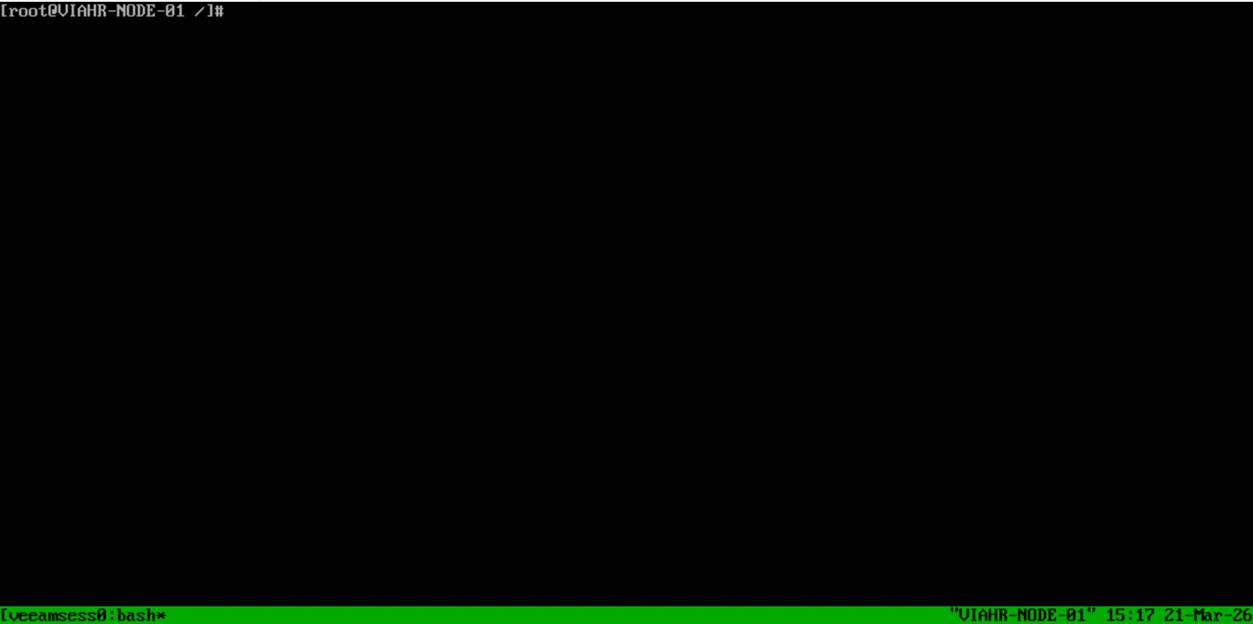
Hit ENTER, and you have shell access with root privileges.

Note that this root shell access is:

  • Time‑limited / non‑persistent
  • Audited
  • The only supported escalation path

Enabling root shell access via the web host management UI

Navigate to the IP address or the FQDN of your appliance over port 10443 and log in.

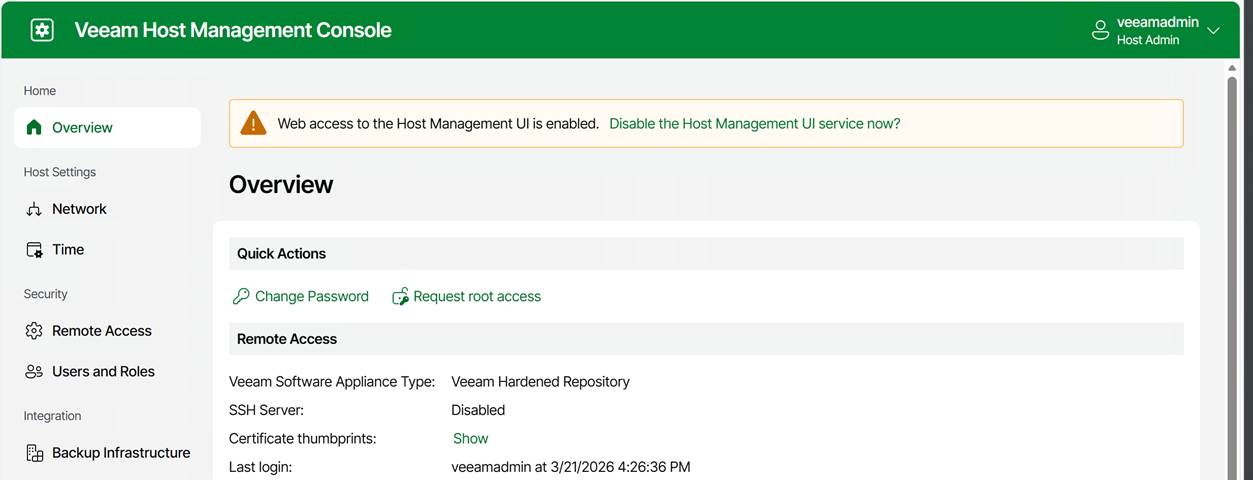
Under Overview, you can request root access. Again, this triggers the security officer approval workflow.

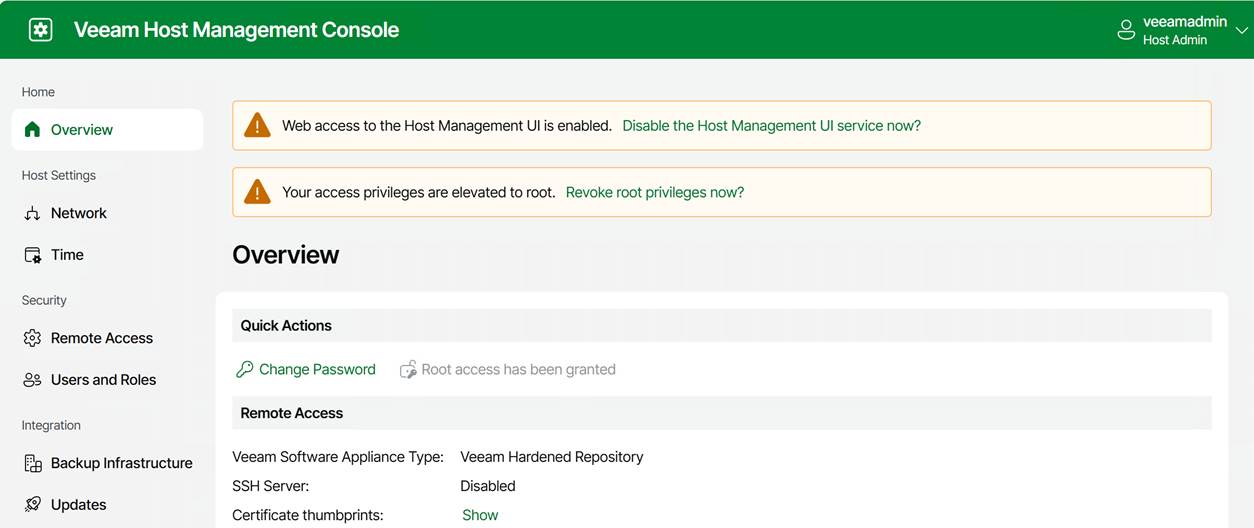
Once approved, a warning is displayed indicating that access privileges have been elevated to root. Note that you can revoke these yourself at any time.

Once approved, the TUI will allow you to open a temporary, audited root shell.

Once shell access is approved, you can:

  • Choose Enter shell in the TUI on the physical or virtual console
  • or enable SSH and log in remotely

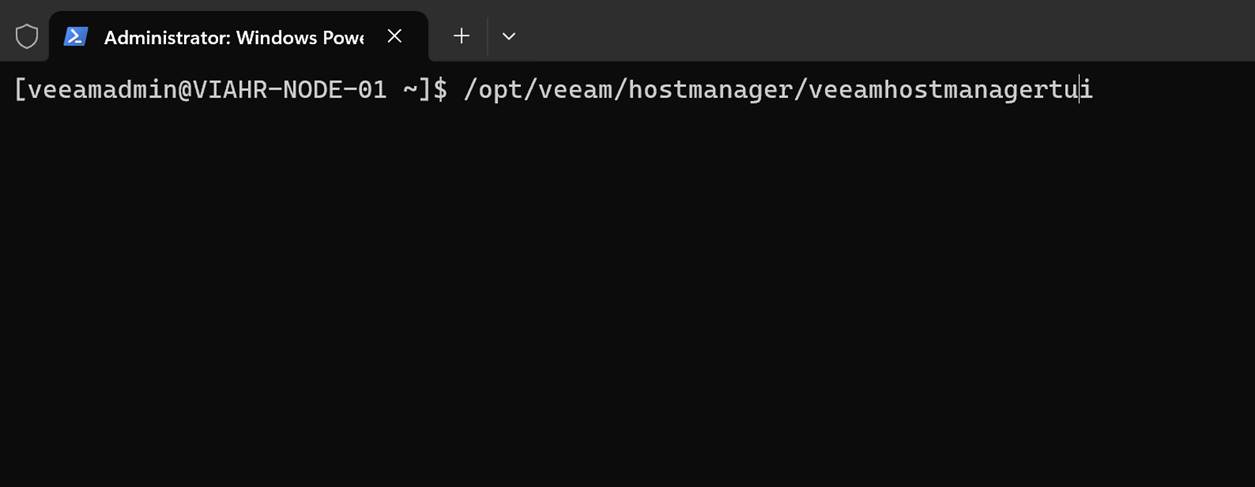
Note that you always authenticate as the Host Administrator, not root. Dropping into the shell is always as root. When logged in via SSH, you do not use sudo or su to become root. You have to launch the TUI manually. Just run:

/opt/veeam/hostmanager/veeamhostmanagertui

That is useful when you want to activate an already-approved root shell without returning to the physical or virtual console.

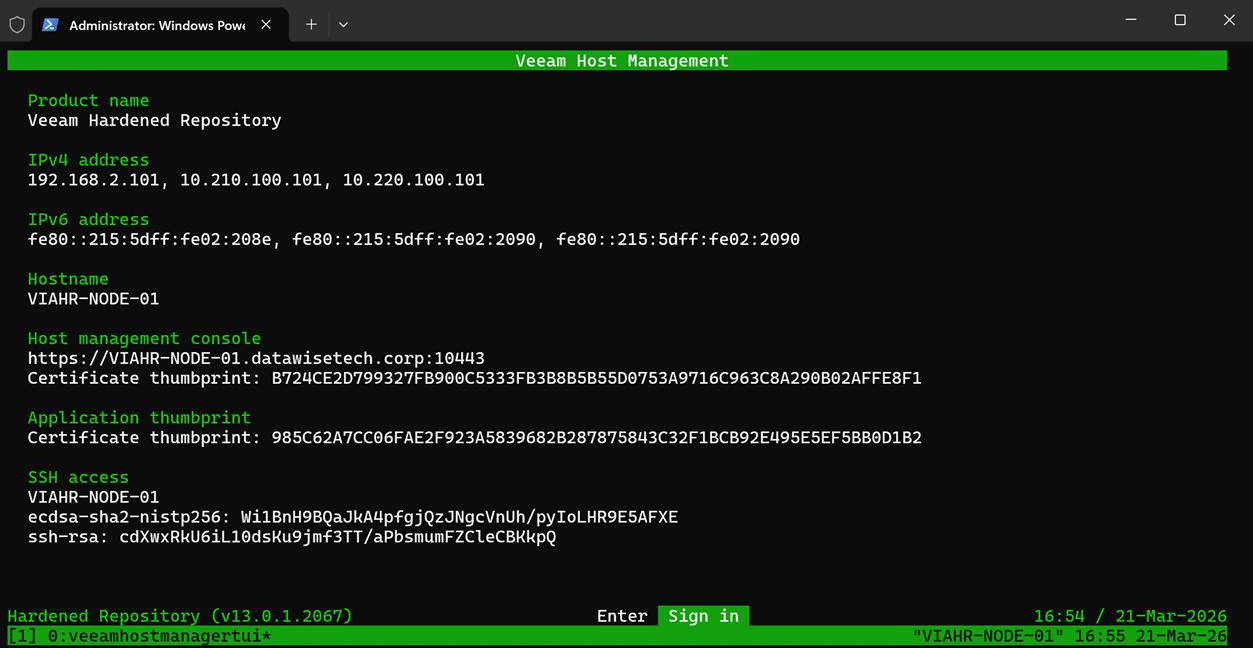
As you can see, you have the same interface and have to sign in again. You can then enter the shell only if approval has already been granted; otherwise, you’ll have to wait for your security officer to approve your request. For people without access to the physical or virtual console, requesting SSH access in combination with root shell access is the only option. SSH alone will never get you to root. Remember that. Because:

  • root login is disabled
  • SSH root login is disabled
  • sudo is restricted
  • No direct escalation paths exist outside the TUI, making it the only supported privilege‑escalation mechanism.

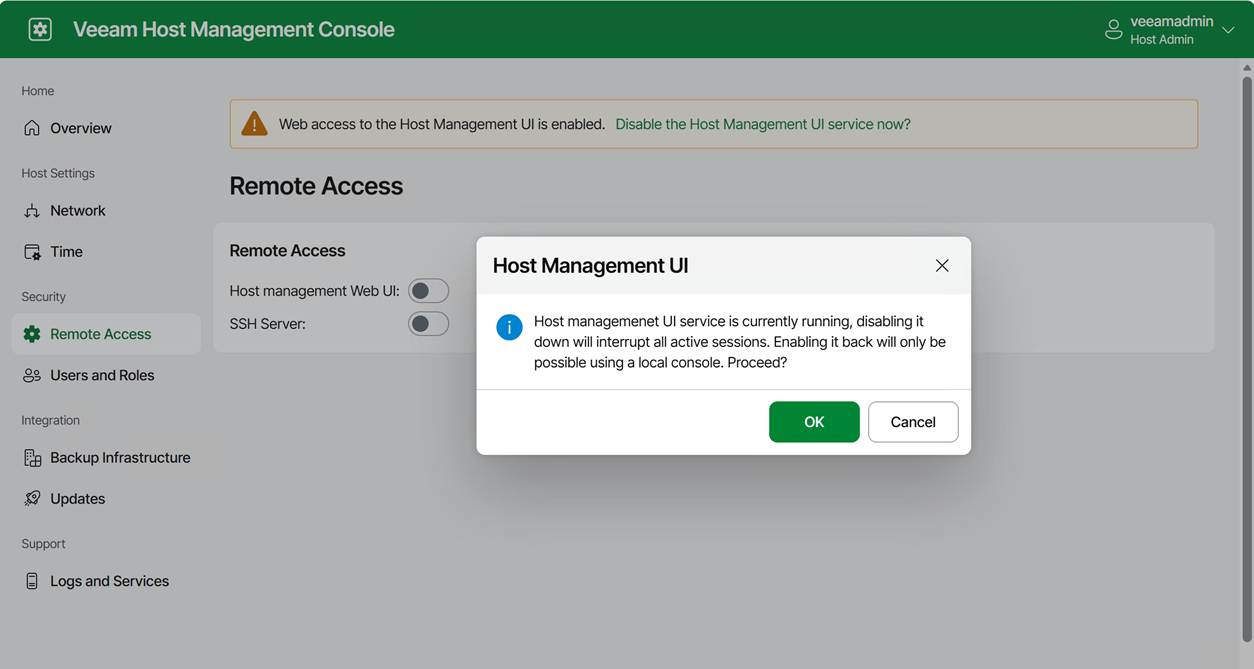
Turning off the host management web UI

The appliance also lets you turn off the host management web UI. Sure, it might sound great for even further hardening, but it comes with an ⚠️ Important catch: turning off the host management web UI can Lock You Out (unless you have physical or virtual console access).

If you disable the web console and you do not have shell access or SSH enabled, the only way back in is through the hypervisor VM console. The physical or virtual console is your last‑resort access path. If you lose that, you have basically lost the appliance if all other options are disabled.

Some operational tips

Use root access with care and only when needed

I hope this is self-explanatory.

Use the web host management console & enable SSH on demand

We handle normal operations via the web consoles and the full console. When SSH is needed, request it.

Never turn off the web console unless you have guaranteed VM console access

If your hypervisor is managed by someone else, for example, think twice. Silos and multiple layers of communication and responsibilities are productivity, efficiency, and support-killing factors in way too many “enterprise”- grade environments. For real people, “enterprise IT” is not the badge of quality and efficiency many think it is; quite the contrary.

The Security Officer must be on call

When you tie actions to a security officer, ensure they are on call and kept informed. Make sure these are people with a clue, not just someone who approves anything without knowing what or why. Also, make sure they are very well aware of what normal backup and recovery operations require and what constitutes an exceptional but valid request. Otherwise, you can’t approve shell or root requests when you need them, or everything gets approved. The technology is only as good as the people and the processes.

Conclusion

While root shell access may be needed in a real-world environment, it should be used only when necessary and with great care. That is why I advise you to enable the security officer in production. And if you are like me, use the security officer feature in labs to make sure you learn and know the processes where this approval is required. How to Open a Root Shell on the Veeam Software or Infrastructure Appliance is also documented on Veeam Backup Enterprise Manager Guide

How I Made Server 2012 R2 Love Hyper-V 2025

Introduction

Yes, Windows Server 2012 R2. Me, the most vocal proponent of keeping your environments up to date, to the level I barely have a Windows Server 2022 under my care anymore.

So what gives? Some people spun up a brand-new Windows Server 2025 Hyper-V cluster and migrated a truckload of their virtual machines over. I love modern infrastructure, so this all sounds very good until they reach out with a little issue. About a dozen of their virtual machines do not boot properly, but into the recovery console. My first question was what is the OS on those virtual machines? When the answer is Windows Server 2012 R2, maybe some Windows Server 2016, I had heard all I needed to know to help “fix” this. The real solution is not running those old out-of-support OS versions anymore, but we can “fix” it so your apps keep running while you upgrade or migrate.

Symptoms

Their older but business-critical Windows Server 2012 R2 VMs—and these were Generation 2, UEFI VMs, no less, but did not boot on their shiny new Hyper-V cluster. The migration itself went smoothly, they said, but when they started the virtual machines, the apps did not come up. So they checked the console logs of those virtual machines and saw STOP 0x0000007B: INACCESSIBLE_BOOT_DEVICE errors and recovery consoles. Rebooting did not help at all. This was a solid, reproducible crash loop, exactly at the point where the OS should hand off the bootloader to the kernel and find its disk. If you’ve been in the game for a while, you know that this usually spells one thing: a fundamental storage or bus driver issue. But why now?

The ACPI Identity Crisis

Windows Server 2012 (R2) and Windows Server 2016 are not supported on Windows Server 2025 Hyper-V. Upgrade or migrate before you move them.

This wasn’t just some random corruption. We were looking at a fundamental compatibility issue. To understand why, you need to understand how Hyper-V and the Guest OS communicate during the boot process.

Server 2012 R2 came out in 2013. Hyper-V 2025 is the latest of the greatest at the time of writing. In the decade between those releases, the “hardware signatures” (Hardware IDs, or HWIDs) that Hyper-V presents to a virtual machine have evolved.

In Gen 2 VMs, Windows relies heavily on the ACPI (Advanced Configuration and Power Interface) tables to find its critical components, especially the virtual machine bus (VMBus) and the storage controllers that attach to it.

When 2012 R2 boots, the kernel says, “Okay, ACPI, show me my storage bus.”

The Hyper-V 2025 host says, “Here is your storage bus, its ID is MSFT1000.”

The 2012 R2 kernel looks in its driver database and goes, “MSFT1000? I have no idea who that is. I’m looking for VMBus or nothing.”

Boom. It can’t see the bus, it can’t load the disk driver, and it can’t find itself so it suffers an Inaccessible Boot Device crash. As the guest has no clue what to do.

The “fix” is in some offline registry editing

Since the VM was in a crash loop and couldn’t boot to Windows, we had to perform some offline registry surgery. Luckily for them, the virtual machines could boot into their recovery environments, so they did not have to boot from an ISO to reach a command prompt and access the offline system hive.

We used a combination of reg load to “mount” the system registry from the VM’s disk onto our repair environment, and then some strategic reg copy commands to “spoof” the IDs.

Step by step

  1. Mounting the Hive:
    Code snippet
    reg load HKLM\TempHive c:\Windows\system32\config\SYSTEM

    (This assumes c: is where the VM’s Windows volume is mounted.)
  2. Map the VMBus to MSFT1000
    Code snippet
    reg copy HKLM\TempHive\ControlSet001\Enum\ACPI\VMBus HKLM\TempHive\ControlSet001\Enum\ACPI\MSFT1000 /s

    This is the core fix. We are telling the 2012 R2 system: “Look, if you ever see a device calling itself MSFT1000, don’t ignore it. Duplicate every single setting, driver binding, and service permission you have for ‘VMBus’ and apply it to this new ‘MSFT1000’ identity.” This essentially links the modern host’s ID to the older OS’s native VMBus driver stack.
  3. Mapping the Generation Counter to MSFT1002
    Code snippet
    reg copy HKLM\TempHive\ControlSet001\Enum\ACPI\Hyper_V_Gen_Counter_V1 HKLM\TempHive\ControlSet001\Enum\ACPI\MSFT1002 /s
    This maps the older Hyper_V_Gen_Counter_V1 identity—used for snapshots and consistency—to its modern equivalent on the 2025 host, MSFT1002. This is crucial for making sure integration services load properly.

After these commands, we had to run reg unload HKLM\TempHive to save our changes. We removed the ISO, rebooted, and… Bingo. The Server 2012 R2 boot screen appeared, and the login prompt followed shortly after.

This works because Server 2012 R2 has the necessary VMBus and storage drivers; it just doesn’t know they are compatible with the hardware IDs reported by Hyper-V 2025. This registry trick just creates that necessary driver-to-hardware binding.

But remember that this is an “unsupported” hack! While this gets the VM booting, moving 2012 R2 to newer hosts often means features might be degraded. Microsoft deprecated official support for 2012 R2 guests on modern hosts a while ago. Windows Server 2016 RTM without modern patching will suffer from the same issue, by the way.

Below is a complete script you can copy and paste into CMD.exe in your recovery environment to fix a virtual machine with this issue.

@echo off
echo.
echo ============================================================
echo   Hyper-V 2025 ACPI Fix for Windows Server 2012 R2 / 2016 RTM
echo   - Adds MSFT1000 (VMBus) and MSFT1002 (GenCounter)
echo   - Auto-detects ControlSet
echo   - Creates SYSTEM hive backup
echo ============================================================
echo.

:: --- Step 1: Detect Windows drive ---
echo Detecting Windows installation drive...
set WINDRV=

for %%d in (C D E F G H I J K L M N O P Q R S T U V W X Y Z) do (
    if exist %%d:\Windows\System32\Config\SYSTEM (
        set WINDRV=%%d:
    )
)

if "%WINDRV%"=="" (
    echo ERROR: Could not find Windows installation drive.
    echo Aborting.
    exit /b 1
)

echo Windows installation found on %WINDRV%
echo.

:: --- Step 2: Backup SYSTEM hive ---
echo Creating SYSTEM hive backup...
copy "%WINDRV%\Windows\System32\Config\SYSTEM" "%WINDRV%\Windows\System32\Config\SYSTEM.bak"
if errorlevel 1 (
    echo ERROR: Backup failed. Aborting.
    exit /b 1
)
echo Backup created: SYSTEM.bak
echo.

:: --- Step 3: Load SYSTEM hive ---
echo Loading SYSTEM hive into HKLM\TempHive...
reg load HKLM\TempHive "%WINDRV%\Windows\System32\Config\SYSTEM"
if errorlevel 1 (
    echo ERROR: Failed to load SYSTEM hive. Aborting.
    exit /b 1
)
echo Hive loaded.
echo.

:: --- Step 4: Detect active ControlSet ---
echo Detecting active ControlSet...
for /f "tokens=3" %%a in ('reg query HKLM\TempHive\Select /v Current') do set CS=ControlSet00%%a

if "%CS%"=="" (
    echo ERROR: Could not determine active ControlSet.
    reg unload HKLM\TempHive
    exit /b 1
)

echo Active ControlSet: %CS%
echo.

:: --- Step 5: Apply ACPI fixes ---
echo Applying ACPI fixes...

echo - Cloning VMBus -> MSFT1000
reg copy HKLM\TempHive\%CS%\Enum\ACPI\VMBus HKLM\TempHive\%CS%\Enum\ACPI\MSFT1000 /s /f

echo - Cloning Hyper_V_Gen_Counter_V1 -> MSFT1002
reg copy HKLM\TempHive\%CS%\Enum\ACPI\Hyper_V_Gen_Counter_V1 HKLM\TempHive\%CS%\Enum\ACPI\MSFT1002 /s /f

echo ACPI fixes applied.
echo.

:: --- Step 6: Unload hive ---
echo Unloading SYSTEM hive...
reg unload HKLM\TempHive
echo Hive unloaded.
echo.

echo ============================================================
echo   FIX COMPLETE
echo   You may now reboot the VM.
echo ============================================================
echo.
pause

Better to do this proactively; I have a PowerShell solution on GitHub that also includes the above .cmd script. The Invoke-TestAndFixHyperV2025ReadinessForLegacyVMs.ps1 script can handle virtual machines that are online, before you move them to Hyper-V 2025. https://github.com/WorkingHardInIT/Invoke-TestAndFixHyperV2025ReadinessForLegacyVMs

But I cannot migrate or upgrade yet!

I call bull shit on most of these in 99% of cases. And if it is not bullshit you really need to get your act together and work on fixing your apps/vendors to never allow getting into such a mess in the first place.

Conclusion

Tech debt. You know that thing every IT manager and department is preventing or solving for the last 30 years is still very much around. Despite all that ITIL, risk and change management, or maybe even due to all that talk and very little action.

Sometimes, saving the day isn’t about deploying the latest and greatest tech; it’s about diving into the deepest, darkest corners of the OS and tricking it into working just one more time. There are no guarantees, and this is a ticking time bomb.

I bought these people some time. Now they need to get working! I also kindly suggested they should read their backup vendors’ support statements 😉.

Azure DevOps is not a second-class citizen

Introduction

The amount of FUD surrounding Azure DevOps and DevOps Server is staggering and perpetuated by rumors, opinions, half-truths, misunderstandings, and even lies. Microsoft has explicitly moved Azure DevOps Server (like Azure DevOps) to the Modern Lifecycle Policy and has a clear path for Azure DevOps.

  • Previously, on-premises versions had fixed “end of life” dates. Under the Modern Policy (updated late 2025/early 2026), it now receives continuous updates, signaling it is a permanent part of the Microsoft portfolio.
  • Reference: Microsoft Lifecycle Policy for Azure DevOps Server (Confirmed active through 2026 and beyond).
  • Azure DevOps has a timeline of support and evolution for modern needs in the Azure DevOps Roadmap: https://learn.microsoft.com/en-us/azure/devops/release-notes/features-timeline. We will focus on this in this document.

While for some GitHub fanboys this might seem painful, for some anti-Microsoft people, GitHub is even evil itself, so there is that. Ultimately, I use both.

Major New 2026 Feature: “Managed DevOps Pools”

Microsoft just launched (and is expanding in early 2026) a massive infrastructure feature called Managed DevOps Pools. Managed DevOps Pools documentation – Azure DevOps | Microsoft Learn

  • This is a heavy-duty investment specifically for Azure Pipelines. It allows enterprises to run pipeline agents on Azure with 90% cost savings via “Spot VMs” and custom startup scripts.
  • This matters because a company doesn’t build a massive new infrastructure scaling engine for a product they plan to dump. This is a direct investment in the future of Azure Pipelines.

Parity with GitHub Security (GHAS)

Rather than telling ADO users to move to GitHub for security, Microsoft brought the security to them.

  • GitHub Advanced Security (GHAS) for Azure DevOps is now generally available (as of late 2025/2026). It includes CodeQL-powered scanning and secret detection, natively integrated into the Azure DevOps UI.
  • Reference: Azure DevOps Release Notes – Sprint 250+ Update.

AI Integration (Copilot for ADO)

Azure DevOps is gaining native AI capabilities.

Summary Table

Evidence TypeDetailStatus (2026)
New VersionAzure DevOps Server 2022 Update 2 / 2025 RCReleased/Active
Major InfraManaged DevOps Pools (Scaling for Pipelines)Generally Available
SecuritySecret/Code Scanning natively in ADOActive Support
AICopilot for Azure Boards & MCP ServerRolling Out

Conclusion

The claim that GitHub is “replacing” Azure DevOps is incorrect. Microsoft is maintaining two distinct tracks:

  1. GitHub: The “Open-Source/Community” DNA or lifestyle.
  2. Azure DevOps: The “Enterprise/Compliance” DNA or lifestyle.

Microsoft is even bundling them—granting GitHub Enterprise customers Azure DevOps Basic access for free, recognizing that many companies use both simultaneously. In reality, both products influence each other as they evolve and modernize.

FeatureOriginally from…Now Influencing…
YAML PipelinesAzure DevOpsGitHub Actions (Standardized the YAML format)
Secret ScanningGitHubAzure DevOps (via GHAS for ADO)
Pull Request FlowGitHubAzure DevOps (Redesigned ADO PRs to match GH style)
TraceabilityAzure DevOpsGitHub Projects (Attempting to match Boards’ depth)

When an enterprise focuses on structured agile & compliance, well-defined, regulated processes, and heavily regulated deployments, Azure DevOps is a natural fit. This is why it is used and integrated into the security models of many enterprises, long before other tools entered the scene via freelancers (Jira, Confluence, GitHub), who now claim this is the way to go. In the end, that is pretty self-serving and disloyal. Sure, shortcomings in corporate processes might have reinforced such behaviors, but switching to those tools will not fix them.

Ultimately, Azure DevOps can both leverage and enhance GitHub in a corporate environment. Better together, where people can optimize tooling for their needs while maintaining compliance.

Addendum

Industry-Leading Project Management (Azure Boards)

For many enterprises, Azure Boards is the primary reason they stay.

Deep Traceability: In ADO, you can link a single line of code to a Pull Request, which is linked to a Build, which is linked to a Release, which is linked to an original “Feature” or “User Story.” This level of end-to-end auditing is required for regulated industries (Finance, Healthcare, Government) and is far more advanced than GitHub Projects. For example: the GitHub-to-Azure Boards connector. A developer in a GitHub Repo can now use a # command in a commit message that not only links to a Jira ticket but also triggers a state change in an Azure Board and a deployment in Azure Pipelines simultaneously.

Scale: Azure Boards can handle tens of thousands of work items across hundreds of teams with hierarchical parent/child relationships that don’t “break” at scale.

Specialized Testing (Azure Test Plans)

This is arguably the “killer app” for enterprise QA.

Manual & Exploratory Testing: GitHub essentially assumes you are doing 100% automated testing. Azure DevOps includes Azure Test Plans, a dedicated tool for manual testing, screen recording of bugs, and “Step-by-Step” execution tracking.

Quality Assurance Evidence: For companies that need to prove to auditors that a human actually tested the software before it went to AWS, ADO generates the necessary “proof” automatically.

Granular Permissions & Governance

Security Scoping: Azure DevOps allows you to set permissions at the Area Path or Iteration level. You can allow Team A to see “Project Alpha” but completely hide “Project Beta” within the same organization. GitHub’s permission model is flatter and often requires more complex “Team” management to achieve the same result. This is a great capability to have, no matter which hyperscaler you target.

Centralized Service Connections: In ADO, you define a connection to AWS once at the project level. In GitHub, you often have to manage secrets or OIDC trusts per repository, which creates a massive management burden for IT teams with 500+ repositories.